ΣΥΝΤΗΡΗΣΗ ΜΙΖΑΣ-STARTER MAINTENANCE
ΑΤΟΜΑ : 1
ΧΡΟΝΟΣ : 120’
ΚΟΣΤΟΣ : 0-10€
ΕΡΓΑΛΕΙΑ ΠΟΥ ΘΑ ΧΡΕΙΑΣΤΟΥΜΕ:
· Καστάνια
· Καρυδάκια Σωληνωτά Νο 13-18 με μακριές προεκτάσεις
· Γερμανικό
Νο 6-13
· Στραβοκατσάβιδο
· Ίσιο
κατσαβίδι
· Κοφτάκι
· Tie-Wraps
· Γράσσο
· Πίεση
αέρα
· Καινούρια καρβουνάκια
· Καινούρια καρβουνάκια
People needed: 1-2
Time: 120’
Cost: 0-10€
Tools:
·
Ratchet
with long sockets No 13-18 with extension
·
No
6-13 wrench
·
Philips
screwdriver
·
Flathead
screwdriver
·
Tie-wraps
·
Wire-cutter
·
Grease
·
Air
pressure
· New brush plate


Βήμα 1-Step 1
Σηκώνουμε το αμάξι με το γρύλλο (μεριά του οδηγού) και τοποθετούμε ένα τρίποδα για ασφάλεια.
Lift the car from the driver’s side and put a tripod underneath
for extra security.
Βήμα 2 (Επάνω μέρος)-Step 2 (above the car)

1.
Αφαιρούμε τον αρνητικό πόλο της μπαταρίας
2.
Στο επάνω μέρος ανασηκώνουμε και απασφαλίζουμε
τη φίσσα (βέλος 1) από τη θέση της. Δεν είναι απαραίτητο να την
αποσυνδέσουμε. Ακριβώς από κάτω υπάρχει
μία πλαστική βάση για τα καλώδια η οποία στηρίζεται σε ένα μεταλλικό λαμάκι το
οποίο θα αφαιρεθεί στο βήμα 3.
3.
Αποσυνδέουμε τη φίσσα(βέλος 2)
4.
Αφαιρούμε το πλαστικό κάλυμμα του καλωδίου που
έρχεται από την μπαταρία και ξεβιδώνουμε το παξιμάδι Νο 13 με το γερμανικό
(βέλος 3). Απομακρύνουμε την άκρη του καλωδίου κάπου που να μην ενοχλεί.
5.
Αν μας ενοχλεί αποσυνδέουμε και το σωλήνα-σπιράλ
που πηγαίνει στο φιλτροκούτι και φαίνεται αριστερά.
1.
Remove the negative terminal of
the battery
2.
Lift and disconnect the wire
harness (arrow 1). It is not necessary to disconnect it. Right below the
harness there is a plastic plate for the wires which is hold by a metal plate
that we will remove at step 3.
3.
Disconnect the wire harness (arrow
2).
4.
Remove the plastic cover of the
wire coming from the battery and unscrew the No13 nut (arrow 3). Put the end of
the wire aside.
5.
Disconnect the spiral-hose coming
from the air filter (you can see it on the left of the battery)
Βήμα 3 (Κάτω από το αμάξι)-Step
3 (underneath the car)
1.
Ξεβιδώνουμε το παξιμάδι Νο 13 της μεταλλικής
βάσης η οποία συγκρατεί ένα μαύρο σωλήνα (βέλος).
2.
Στη συνέχεια του σωλήνα και δίπλα στον τροχό του οδηγού υπάρχει άλλη μία
μικρή βάση η οποία καλό θα ήταν να ξεβιδωθεί και η οποία δε φαίνεται στις
φωτογραφίες.
3.
Κάτω από το παξιμάδι βρίσκεται η μία από τις δύο
βίδες Νο 18 της μίζας την οποία
αφαιρούμε (περίπου 20 cm το μήκος της)

4.
Η άλλη βίδα βρίσκεται στο πάνω μέρος ακριβώς
κάτω από το λαμάκι που αναφέραμε στο βήμα 2-2.
5.
Για να την ξεβιδώσουμε βολεύει καλύτερα από το
κάτω μέρος με καρυδάκι και μεγάλη προέκταση. (Θα χρειαστείτε έναν βοηθό να
καθοδηγήσει την καστάνια από το πάνω μέρος)
6.
Όπως με την κάτω βίδα, με το καρυδάκι Νο 13
αφαιρούμε τη βίδα που συγκρατεί το λαμάκι.
7.
Όπως με την κάτω βίδα, με το καρυδάκι Νο 18 αφαιρούμε την πάνω βίδα της
μίζας (ΠΡΟΣΟΧΗ πρέπει να κρατάτε τη μίζα για να μην πέσει επάνω σας)
8.
Τραβάμε τη μίζα έξω.
1.
Unscrew the No 13 nut which holds
the metal plate of a black hose (arrow)
2.
Follow this hose and near the
driver’s wheel there is another plate which you should better remove to have
better access (it is not in the pictures)
3.
Under the No 13 nut there is the
one of the two No18 bolts which hold the starter. Remove this lower bolt, its length
is about 20cm.
4.
The other upper bolt is right
above the metal plate we mentioned at step 2-2.
5.
In order to remove this bolt it
is better to get underneath the car and use a ratchet with a long extension
(you might need someone above the car to guide the extension with the No18
socket).
6.
As in the lower bolt, first
remove the No13 nut which holds the metal plate.
7.
Now carefully remove the No 18
long bolt holding simultaneously the starter.
8.
Pull the starter out.
Βήμα 4 (Συντήρηση μίζας)-Step 4 (starter maintenance)

1.
Με καρυδάκι Νο 13 αφαιρούμε το παξιμάδι (βέλος
1)
Remove the No 13 nut (arrow 1)
2.
Με το στραβοκατσάβιδο αφαιρούμε τις 2 βίδες
(βέλος 2) και στη συνέχεια το μικρό καπάκι, την ασφάλεια και τις 2 ροδέλες:
Use the Philips screwdriver to
remove the 2 screws (arrow 2) and then remove the small black cap, the 2
washers and the securing washer.

3.
Με το γερμανικό Νο6 αφαιρούμε τις 2 μακριές
βίδες της μίζας και το στρογγυλό καπάκι:
Remove the 2 No6 long bolts and
lift the round black cap.

4.
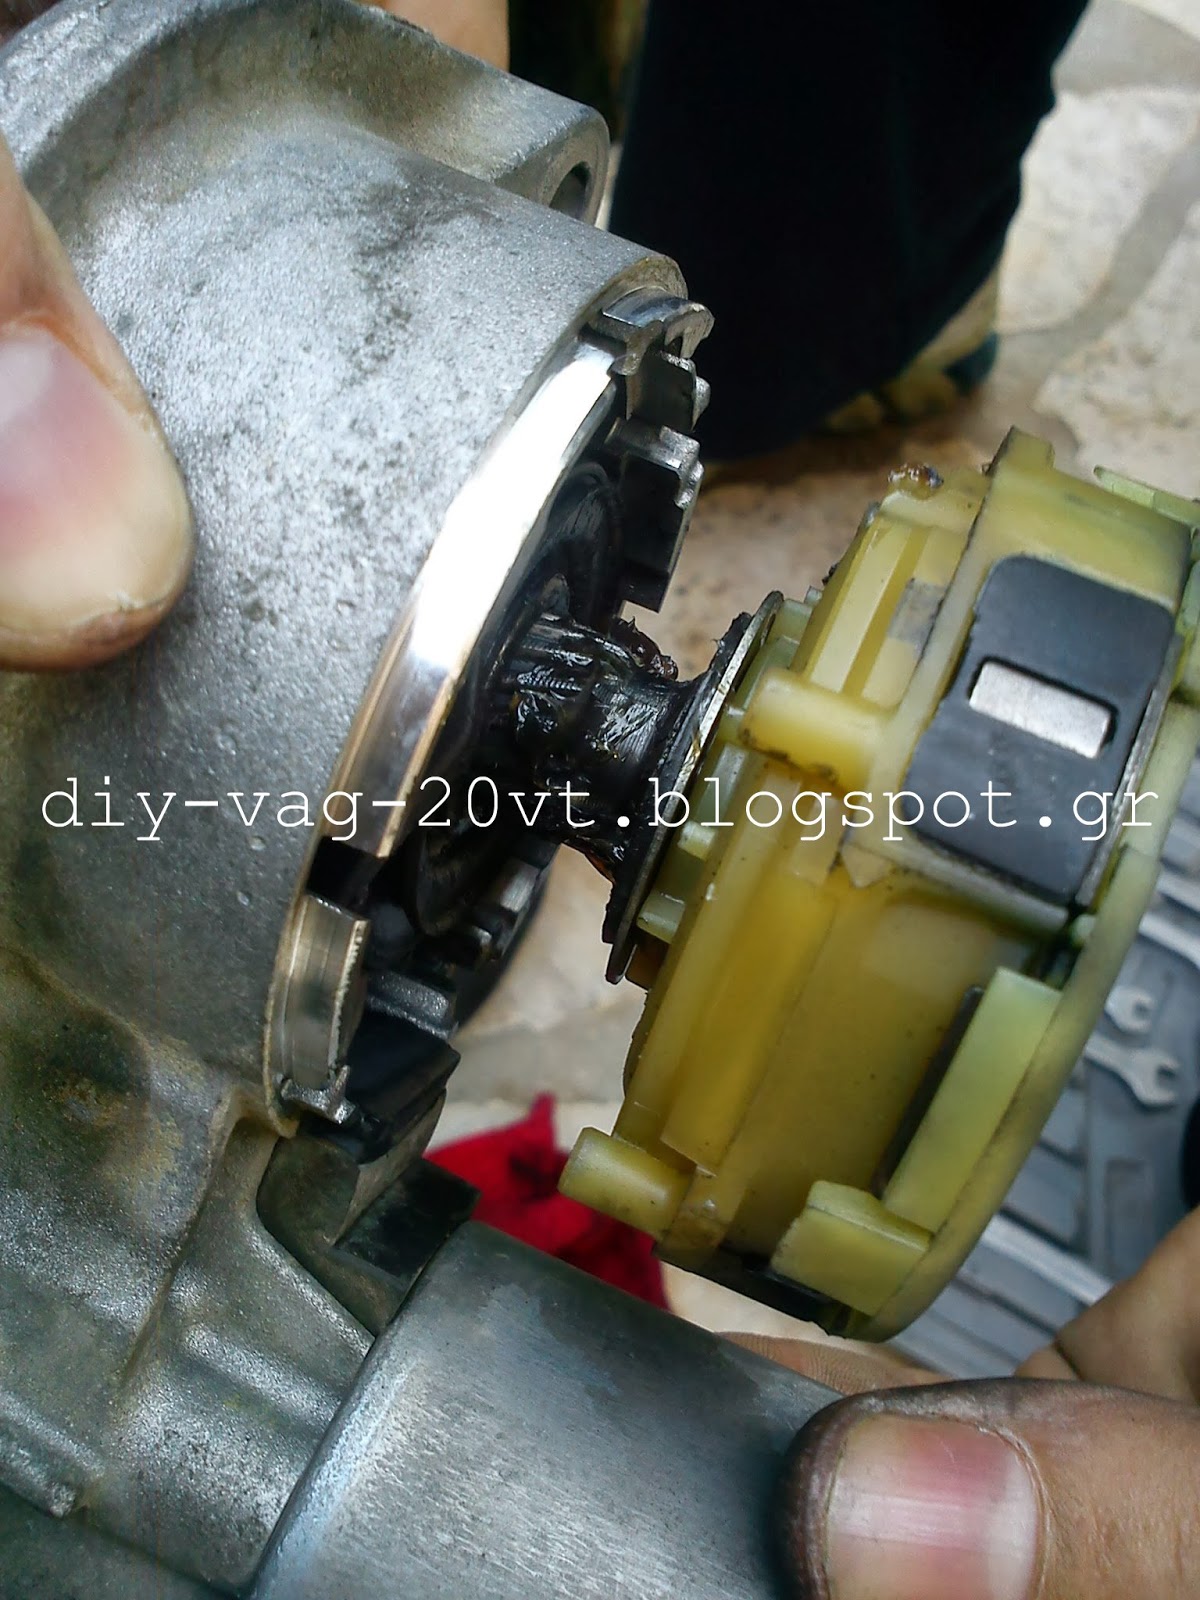
Αποχωρίζουμε το μαύρο κομμάτι της μίζας (μοτέρ)
από το σώμα της:
Separate the black part of the
starter (motor) from its body.

5.
Στο πάνω μέρος του μοτέρ τραβάμε με προσοχή τη
βάση με τα καρβουνάκια. Παρατηρήστε πολύ καλά πώς τοποθετούνται γιατί θα λυθούν
κατά τον καθαρισμό. Τα καθαρίζουμε και τα φυσάμε πολύ καλά. Εάν έχουν φαγωθεί
πάρα πολύ πρέπει να αλλαχθούν, υπάρχει σαν ανταλλακτικό :
At the upper part of the motor
remove the brush plate assembly. Notice how the brushes are installed because during
cleaning they might be removed. Clean it and blow it with air. If needed
replace the brushes (cost 15€)

6.
Αποχωρίζουμε το ρότορα από τον στάτορα του μοτέρ, τα σκουπίζουμε και τα
φυσάμε με αέρα (θα δείχνει σαν καινούριο όπως βλέπετε):
Separate the stator from the rotor, clean it thoroughly and
blow them with air (after that it will look good as new)


7.
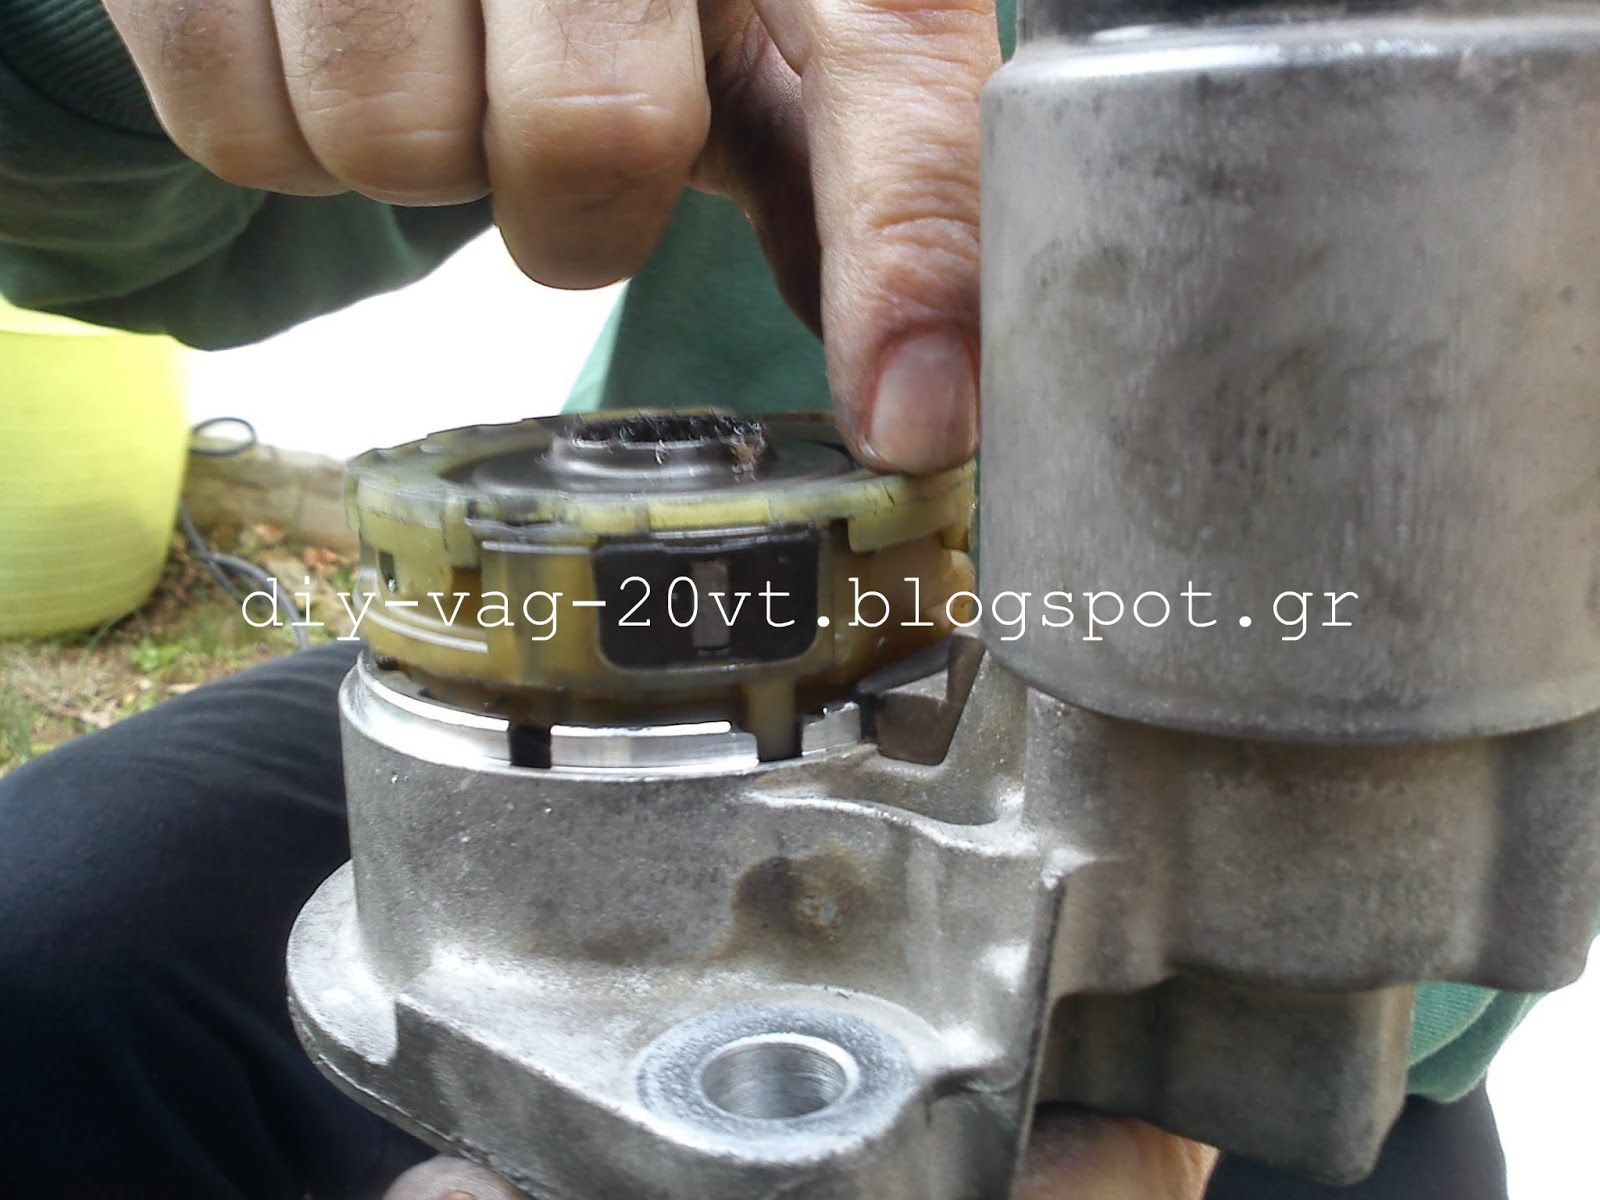
Στο σώμα της μίζας αφαιρούμε το καπάκι των
γραναζιών, καθαρίζουμε και γρασάρουμε και επανατοποθετούμε (εάν ανασηκώσουμε τη
βάση των γραναζιών υπάρχει άλλο ένα γρανάζι το οποίο μπορούμε να γρασάρουμε
όπως βλέπετε):
At the gear housing, remove the
cap of the gears, clean, grease and refit the cap. (if you lift the gear base,
there is another gear which we can grease as well)

ΜΗ ΒΑΛΕΤΕ ΠΟΛΥ ΓΡΑΣΣΟ ΓΙΑΤΙ ΘΑ ΒΓΕΙ ΣΤΑ ΚΑΡΒΟΥΝΑΚΙΑ (ΒΑΛΤΕ ΛΙΓΟΤΕΡΟ ΑΠΟ ΤΗΣ ΦΩΤΟΓΡΑΦΙΑΣ)
DO NOT APPLY TOO MUCH GREASE (APPLY LESS THAN WHAT YOU SEE AT THE PICTURE)

Βήμα 5 (Δέσιμο μίζας)-Step 5 (starter reassemble)
1.
Φτιάχνουμε την πλακέτα από τα καρβουνάκια και
κατά προτίμηση χρησιμοποιούμε tie-wraps για
να μείνουν στη θέση τους
Reassemble the brush plate and
use tie-wraps to hold the brushes in place.

Αν δείτε μεγάλη φθορά στα καρβουνάκια αλλάξτε τα με καινούριο σετ:
If the brushes are torn, replace the brush plate.
2.
Τοποθετούμε τα καρβουνάκια στο ρότορα και
κόβουμε τα tie-wraps:
Install the brush plate at the
rotor and cut the tie-wraps.

3.
Τοποθετούμε το ρότορα στο στάτορα (προσοχή γιατί
ο μαγνήτης θα τον τραβήξει μόνος του κάτω)
Place the rotor inside the stator
(BE VERY CAREFUL because the magnet will
pull the rotor downwards)
4.
Τοποθετούμε το στρογγυλό καπάκι και απλά περνάμε
τις μακριές βίδες.
Place the round cap and the two
long No6 bolts.
5.
Τοποθετούμε το μαύρο καπάκι και το βιδώνουμε (να
μην ξεχάσουμε την μεγάλη ροδέλα, την μικρή και την ασφάλεια που βρίσκονται
εντός).
Place the small black cap and the
washers and screw the two bolts.
6.
Συνδέουμε προσεκτικά το μοτέρ με το σώμα (θα
πρέπει να κουμπώνει χωρίς δυσκολία. Προσοχή στο σημείο που δείχνουμε να είναι
σωστά γυρισμένο (το κιτρινωπό κάλυμμα των γραναζιών κουμπώνει σε διάφορες
θέσεις αλλά στη σωστή είναι πλακέ στη θέση που δείχνουμε)
Carefully assemble the gear
housing with the motor. It should fit without difficulty. BE VERY CAREFUL at
the part I point with my finger. The gear cap may fit different positions but
only THIS is the right place.

7.
Τέλος βιδώνουμε τις 2 μακριές βίδες του μοτέρ.
Finally screw the 2 No 6 long
bolts.
Βήμα 6 (τοποθέτηση μίζας)-Step 6 (starter installation)
1.
Κούμπωμα μίζας
Put the starter in place
2.
Τοποθέτηση πάνω βίδας Νο 18
Install the upper No18 bolt
3.
Τοποθέτηση πάνω μεταλλικής βάσης και παξιμαδιού Νο 13
Install the upper metal plate and
the No 13 nut
4.
Τοποθέτηση κάτω βίδας Νο 18
Install the lower No18 bolt
5.
Τοποθέτηση κάτω μεταλλικής βάσης και παξιμαδιού
Νο 13
Install the lower metal plate and the No13 nut
6.
Σύνδεση βάσης μαύρης σωλήνας που πιθανόν
αφαιρέσαμε κοντά στον τροχό.
Connect the plate of the black
hose which we might have removed near the driver’s wheel
7.
Σύνδεση πάνω φίσσας (αντίστροφο βήματος 2-3)
Connect the upper wire harness
(step 2-3 reverse)
8.
Τοποθέτηση πάνω φίσσας και κούμπωμα της βάσης
στο μεταλλικό λαμάκι (αντίστροφο βήματος 2-2)
Place the upper wire harness and
install its base on the metal plate (step 2-3 reverse)
9.
Σύνδεση καλωδίου μπαταρίας με παξιμάδι Νο 13 και
τοποθέτηση μαύρου καλύμματος.
Connect the wire coming from the
battery, screw the No 13 nut and put the black cup.
10.
Σύνδεση σωλήνας που πηγαίνει στο φιλτροκούτι
(εάν αφαιρέθηκε)
Connect the ribbed hose coming from
the air filter box.
11.
Σύνδεση μπαταρίας
Connect the battery terminal
thank you for this - can you confirm where the positive cable goes? - to the solinoid?
ReplyDeletesorry for the late reply, I can'y quite recall but it should be the positive as it is grounded (-) on the engine.
ReplyDelete